Both MKV and MP4 are container formats to store multimedia data including video, audio, pictures and subtitles, also allow streaming over the internet. MKV and MP4 are both container types which typically for h264 encoded video. Both containers have advantages and disadvantages in what products are capable of using them to decode h264, and what kind of data they can contain.Although many users may have to convert their videos into other formats sometime, the world of video formats can be pretty confusing to them. Actually, it's nothing new that users can hardly figure out the right format from MKV vs MP4, two most common video formats. Here this article gives detailed information about the two video formats to help you choose the one better suits your need.mp4 are better quality: No. Mkv containers can scale to higher quality than mp4 containers, and can contain higher quality streams and more advanced forms of subtitling.mp4 takes up less space: No. Either has the possibility of being larger or smaller depending on certain options. The difference is typically negligible. Mkv's can be typically found to be larger, because the mkv container allows for more options and higher quality tracks - data that is not allowable in an mp4 container.PS4 does not support mkv: No. The PS4 does support mkv, but there are restrictions. h264 video is encoded to quality levels, and most devices have restrictions to how high a quality level they can play back - the PS4 included. As long as the quality level isn't too high, the PS4 can play it back.To conclude: mkv is more advantageous when you have a powerful playback device. mp4 is more advantageous for lower-end devices and universal compatibility.Wanna Convert Videos to/from MP4 MKV?Different video formats have their special purposes to satisfy various users' needs. Which one is the most suitable one depends on your own specific requirement. Though confusing and complex the format field is, you only need to concern yourself with a few. Through the brief comparison between MKV and MP4, you are expected to have deeper understanding of MKV vs MP4 to better choose the one you really need. If you are not especially fussy about the quality, here MP4 is highly recommended as it is mobile device friendly and has relatively good quality.If you want to convert your videos to MKV or MP4, you can accomplish your task with Pavtube Video Converter /Mac Version.(review) Built in 370+ video & audio codecs, Pavtube Video Converter can Convert MKV to/from MP4 as well as transfer among HD videos like MKV, M2TS, MTS, TS, AVCHD and MP4, MOV, FLV, WMV, AVI, etc with no quality loss and out-performs other competitors up to 5x faster, thanks to the only support of hardware encoding technology. Also compressing and converting MKV MP4 is a piece of cake to this feature-rich video converter.
 How to Convert MKV to MP4/MP4 to MKVFirst free download and install Pavtube Video Converter on your Mac/PC(here I choose mac version as example), and then launch it. Now just follow the step by step guide to make conversion more smoothly.Step 1: Run it and click “File” > “Add Video/Audio” or “Add from Folder” to import files. You can also directly drag and drop the files.
 Step 2: Just go to the format list by clicking the format bar and choose “Common Video” and pick the MKV or MP4 you want.
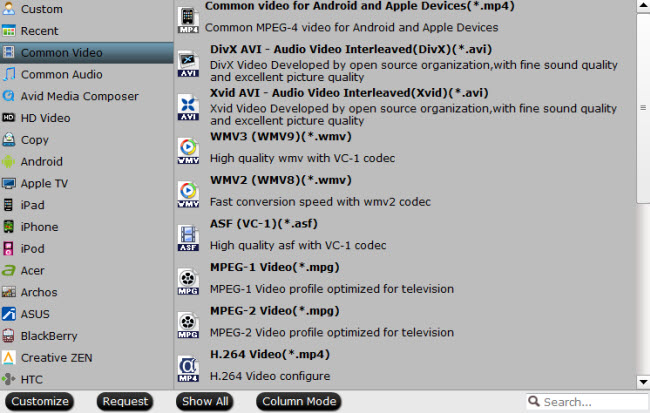 Step 3: Specify output folder on your computer to save the output files. Click the "Browse" button to choose the path where you want to save the output files in. Click the "Convert" button at the lower right corner of the interface to begin to convert MKV to MP4/MP4 to MKV. After the conversion is finished, you can transfer the video to your desired output devices or editor for enjoyment.Read More:
Summary: In this article you will learn the basics of what 4K is and what you'll need to work with 4K footage.
 4K: What you need to know?
The name 4K is used to describe a couple different, though very similar, standards. 4K is a video specification that literally just means '4,000'. It gets its name from the approximately 4,000 pixels of width of the footage. The form you're most likely encounter is Ultra High Definition or UHD, the new standard for 4K television. 4K video is poised to become the new benchmark for both recording and watching video and it brings a whole host of benefits, right away.
You've probably already noticed the jump from pre-digital 'standard definition' television up to 'HD' and 'Full HD' services that are now available on digital TV, online streaming and Blu-Ray discs. Compared to earlier standards, this HD footage is detailed, crisp and it even looks good when viewed on a large TV. But even the best quality, '1080p' HD footage is only 1920 pixels across. 4K is significantly more detailed, since it has twice as many pixels horizontally, and four times as many pixels in total.
Hot Search: Play 4K on TV | 4K to iMovie/FCE/FCP | Play 4K on Windows 10
Do I need a new computer?
Apple's Mac Pro desktop computer is more than enough to handle 4K editing, compare with an iMac/Mac Pro, or even with the new computer, to handle 4K workflows effectively, you would have to add-on a Thunderbolt expansion chassis with a RED Rocket card or RED Rocket X card, at least one or two powerful graphics cards such a the GTX 680, and a beefy Thunderbolt RAID like a Promise Pegasus 6-drive model.
That is to say, there is unfortunately no way you will be able to edit native 4K files at any of the higher quality, lower compression rates. The only way would be to transcode to a lighter codec, such for Adobe Premiere, the best compatible format or codec is MPEG-2, for Final Cut Pro, the best compatible format or codec is Apple ProRes(Apple ProRes Codec Types), for Avid, the best compatible format or codec is Avid DNxHD(*.mov). Well…yes, if you convert to those compatible original format and scale to 2K for editing.
The best solution to edit 4K video is to convert 4K files to those compatible original format for each editor. Pavtube Video Converter / Mac Version may help you a lot on this convert part, this is the top 4K video converter on the market, it can convert any 4K videos recorded by Red 4K camcorders, Sony 4K camcorders, Panasonic 4K camcorders, Canon 4K camcorders, JVC 4K camcorders, etc. to compatible original format for each editor.

 Key Features of Pavtube Video Converter.
- Convert almost all 4K/HD/SD audio/video formats: All types of audios and videos (e.g. 4K/SD/HD/Tivo/DRV/Camcorder HD footages, etc) to almost any audio and video formats.
- hange default settings: You can change the parameters such as video size, bitrate, frame rate, and channels for your video file according to your need to get the best output effect.
- Batch conversion: Handle multiple videos and realize batch conversion to save your time and energy.
- Merging & splitting: Merge several video clips into one bigger file and splitting one video file into several clips according to the clip quantity, duration time and file size.
- Create new output format: Adjust profile parameters, rename and save it for future use.
- Supported OS: Windows XP/2003/Vista/Windows 7/Windows 8/Windows 8.1/Windows 10
- Supported OS: Mac OS X 10.11 El Capitan, Mac OS X 10.10 Yosemite, 10.9 Mavericks, 10.8 Mountain Lion, 10.7 Lion, 10.6 Snow Leopard, 10.5 Leopard
How to Make Eidting Work More Smoothly?
First free download and install Pavtube Video Converter on your Mac or Windows, and then launch it. Now just follow the step by step guide to make editing work more smoothly.
Step 1: Install and launch this program. Just drag and drop video files to the main interface of the program to add videos. If you have several video files that you want to convert in batch, just drag the folder where the sources are to the software.
 Step 2: Click the “Format” drop-down menu to choose an output format that you prefer.
From "Format" drop-down lists, you can select Avid Media Composer preferable editing codec from "Avid Media Composer" > "Avid DNxHD(*.mov)" as the output format.
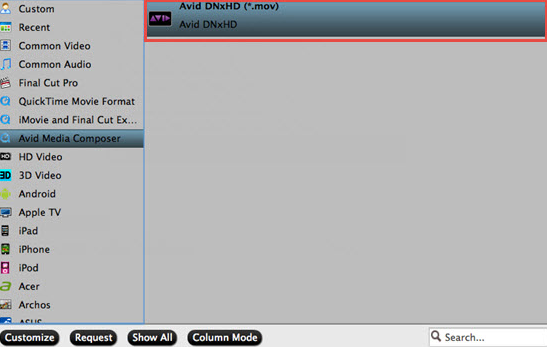 Click "Format" bar, from its drop-down options, move your mouse to "Final Cut Pro > Apple ProRes 422 (*.mov)" to select it as the output file format.
 From the "Format" drop-down list, go to select "Adobe Premiere Pro/Sony V..." >"MPEG-2" as the most suitable output format for Adobe Premiere Pro.
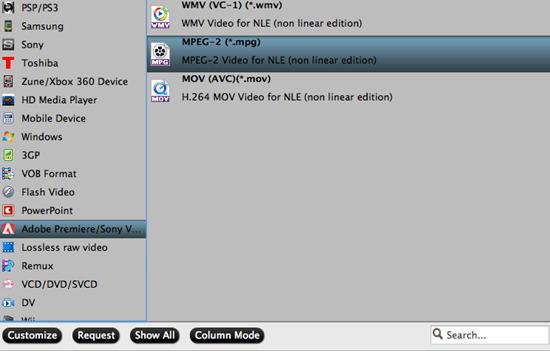 Step 3: Before converting, you can edit the Canon footage to achieve a better overall effect. Simply highlight a video clip and click the “Edit” button beside it to enter the Video Edit window. You can then crop, trim, rotate videos, adjust Canon recordings effects, add text/image watermarks, etc. as you like.
Or you can open "Profile Settings" window to adjust the output video codec, size, bit rate, frame rate, audio codec, sample rate, bit rate and channels. Here i just give a Apple ProRes as the example, others for Avid and Premiere are nearly the same.
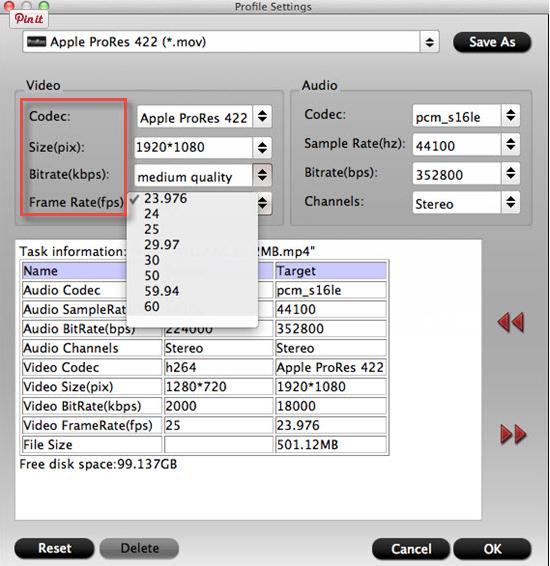 Step 4: Hit the convert button under the preview windows, the conversion will started immediately.
When the conversion is completed, run the editor and import the converted footage with more smoothly editing.
Read More:
Summary: Chromecast makes the way of watching movies on TV more convenient. What if you have some videos Chromecast doesn’t support? Well, this article is exactly about how to play any kind of videos from the computer and other devices to TV via Chromecast.Chromecast is developed by Google. And from Google official document, we can see that Chromecast only supports very limited file types. So some video formats, such as MKV, AVI, part of MP4, FLV, WMV, MPG, MOV, won’t be recognized by Chromecast and it will cause you can’t play them from the computer and other devices to TV via Chromecast. Luckily, from the document mentioned above, we can know that the compatible format for Chromecast is H.264 MP4. So as long as we convert MKV, AVI, part of MP4, FLV, WMV, MPG, MOV videos to H.264 MP4 format, all the playback problem with Chromecast will be solved. As a result of so many unsupported formats by Chromecast, if you get a professional video converter and that will be much helpful.Here I recommend a perfect converter app to you - Pavtube Video Converter for Mac. This app is able to converter MKV, AVI, MP4, FLV, WMV, MPG, MOV, etc. videos to H.264 MP4 format for playing to TV via Chromecast. There is also a Windows version for this video converter, if you need it, please turn to Pavtube Video Converter. Multi-platform support enable you to play MKV, AVI, MP4, FLV, WMV, MPG, MOV videos form whether MacBook or Windows PC to TV via Chromecast with no problem.
 How to Play Videos from Computer and other Devices to TV via ChromecastStep 1. First run this video converter, click "Add Video" or "Add from folder" button to browse and choose your MKV, AVI, MP4, FLV, WMV, MPG, MOV videos.
 Step 2. H.264 MP4 is built in this video converter. Just click on the format bar and follow "HD Video" to click "H.264 HD Video(*.mp4)".
 Step 3. After the setting work, click the "Convert" button in the main UI, this video converter will start to convert MKV, AVI, part of MP4, FLV, WMV, MPG, MOV videos to H.264 MP4 format. When the conversion is finished, you can feel free to play any video from computer and other devices to TV via Chromecast. Enjoy!Read More:
Summary: I find many Windows 10 users said they have trouble with Windows Movie Maker in the discussion board. Don’t upset. This article will show you the causes in detail and give you some tips to fix it.
Microsoft provides a built-in video editor on Windows 10 – Windows Movie Maker, which is just like iMovie on Mac OS X El Capitan. Due to the openness of Windows 10, it can be installed on some devices with old hardware. Here comes the problem. The video editing work in Windows Movie Maker requires quite high hardware. So if the hardware of your Windows 10 PC is too low or old, then Windows Movie Maker won't Work. And a message like the picture below will pop up.
 In order to prevent this issue from happening to you, please make sure that your Windows 10 computer meets all necessary requirements before launching Windows Movie Maker. To let you edit videos in Windows Movie Maker with no problem, I would suggest you to upgrade the hardware of your Window 10 PC to meet the necessary requirements.
If the issue mentioned above still persists and the solutions offered above didn't solve the problem, the best way is to look for an alternative to Windows Movie Maker, such as Pavtube Video Converter. Just like Windows Movie Maker, this video editor allows you to add videos, pictures, audio, and make a snapshot. It also enables you to add a new subtitle on the selected videos, as well as captions. In the meantime, this video converter supports for exporting videos as multiple formats or trim videos for uploading to Facbook, YouTube, etc.

 How to Make Windows Movie Maker Work on Windows 10
Step 1. First, run this video editor. Click "Add Video" or "Add from folder" button to browse and choose your videos, or you can drag and drop files to its interface.
 Step 2. Then click “Edit” button and the video editor window will pop up. You can use the video editor to do many editing work like cutting unwanted segments, cropping annoying black edges in your videos, adding watermarks for remarks or fun, adding special effects, etc.
 Step 3. In the “Format” list, you can see a large number of preset output profiles in there. Just choose what you want according to your needs.
 Step 4. Finally, go back to main UI and click the big "Convert" button. This video converter will start to output the final videos. Once the process is done, you can find your videos by clicking "Open" button. Enjoy!
Read More:
Summary: The post will discuss how to convert Canon video to MKV/VOB/AVI/MOV/MP4/MPEG/WMV/FLV etc. for storage in hard drive and play with any apple device you like.You have dozens of shootings on the Canon camera, and you want to transfer them to your iPad or other iOS devices for viewing. The steps should be straight-forward and easy, but it turns out your hours of work ends up in vain. Don’t worry, as this article covers everything you concern with Canon footage – from how to backup Canon video to Mac hard drive to step-by-step guide of transferring Canon video to iPad on Mac.Backup footage from Canon Camera to Mac HDDTo view and backup Canon footage on Mac, proceed as follows:1. Connect Canon Camera to Mac computer via USB cable(leave the memory card in camera)2. Turn on your Canon camera. Here we take Canon VIXIA HFR100 for example.3. Open the screen on the camera and press the (camera/play) button.4. If the devices election screen appears, select Computer/Printer with the joy stick and then press Set.5. The camera should now appear as a storage device on the desktop. The footage media files are stored under /PRIVATE/AVCHD/BDMV/STREAM and named with file extension .MTS. 6. Now you can decide either to back up your footage or use Final Cut Pro or iMovie to import and edit the mediaright away.Convert Canon Video to Apple Devices Playable Format Pavtube Video Converter / Mac Version is the best video transcoding software for Canon users. It is also an easy-to-use and practical 4K Video Converter Software, which can help you convert any video to 4K H.264 MP4. So that you can play Canon video with any Apple devices you like.Hot Search: Ingest Canon AVCHD to FCP X | Encode Canon MXF to Multi-track Apple Prores | Import Canon AVCHD MP4 to Davinci Resolve
 Key Features of Pavtube Video Converter
- Convert Canon MXF/MOV/MP4 to any video format
- Transcode Canon MP4, AVCHD, MXF and ProRes 422 video for editing software
- Encode Canon MP4, AVCHD, MXF and ProRes 422 footage to 3D
- Convert Canon recordings for sharing, uploading, watching, etc
- Edit Canon video files on Mac and Windows via trim, crop
How to convert Canon video for Apple devices?Step 1: Install and launch this program. Drag and drop Canon video to the software. You can import multiple files at once thanks to “Add from folder” button.  Step 2: Click the “Format” drop-down menu to choose an output format that you prefer. This Canon Video Converter software can convert video to various video formats like MP4, MOV, MKV, FLV, AVI, WMV, 3GP, etc. and video presets for 150+ portable devices.
  Step 3: Before converting, you can edit the Canon footage to achieve a better overall effect. Simply highlight a video clip and click the “Edit” button beside it to enter the Video Edit window. You can then crop, trim, rotate videos, adjust Canon recordings effects, add text/image watermarks, etc. as you like. Step 4: When you’re ready, click the “Convert” button to convert Blackmagic videos.Conclusion: Before converting videos, you can preview the video, while the converting you can set the actions like shut down computer and open output folder when conversion is completed. When the conversion finished, you can easily play the Canon video with any Apple device you want.Read More:
Summary: Still have doubt about how to convert HD Videos to H.265(HEVC) MP4/MKV for playing on Sony 4k TV? Let’s see step by step procedure to convert MKV and others to H.265/HEVC MP4/MKV files and you will get a clear idea.A lot of Sony video recorder and GoPro users want to convert their video files to H.265 format since it's the best format in Sony 4k TV for video experience. In order to convert different video files like MKV and others (WMV, AVI, MP4, FLV, M4V, MOV, MPEG, MPG, VOB) to H.265, you will need to have a reliable H.265 converter to do the job. So if you want to get started and convert your MKV video files to H.265 in Sony 4k TV but don't have any idea where to begin, Pavtube Video Converter / Mac Version here can help you.Pavtube Video Converter Features
- Powerful Video Converter: Converts almost every video format to or from H.265 video filess rapidly in high quality.
- Wide Selection of Formats Supported: Converts any video files to MKV, AVI, MP4, MOV, 3GP, WMV, and a lot more.
- Fast-Speed Video Converter: Converts videos faster than any other video convert software programs.
- Lossless Conversion: Convers any video files without the risk of losing its original quality.
- Supported OS: Mac OS X 10.5 and later, Windows XP/2003/Vista and later

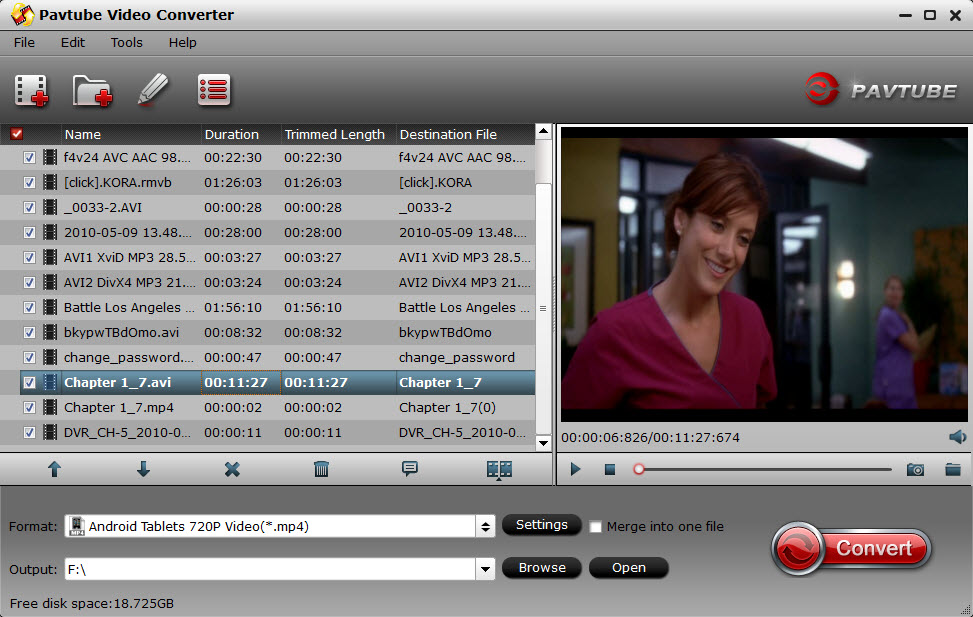
 Convert HD Videos to H.265(HEVC) for Playing on Sony 4k TVStep 1. Import video files.Download a copy of this H.265 Converter, click “Add Video” to import your H.265 video files.
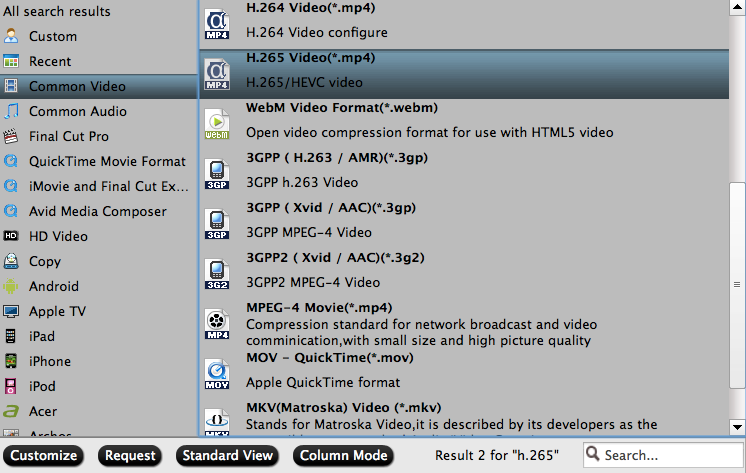
 Step 2. Choose target format.Hit format list and choose “Common video>H.265 Video (*.mp4)” as below:
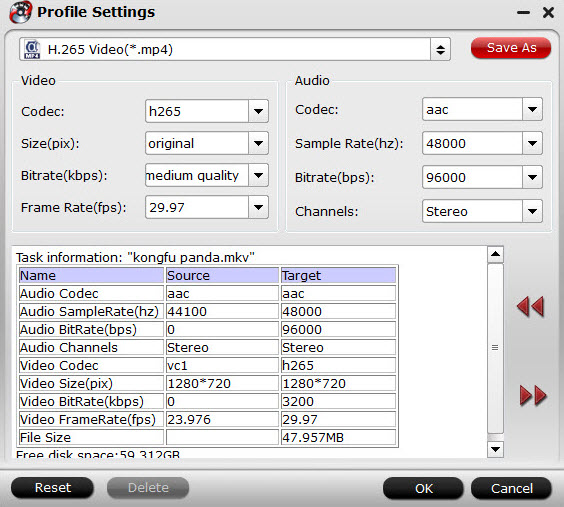
 Step 3. Adjust output file parameters (Optional)You are allowed to adjust video and audio parameters if you are not satisfied with default settings. Presets like size, bitrate, frame rate, audio channels, etc. can be customized in your own way.
 Step 4: Start converting Video to Sony 4k TV H.265 MP4Now hit on the “Convert” button on software main interface to start the conversion. After conversion, hit “Open” or “Open output folder” to quick locate generated H.265 MP4 files. Then transfer it to Sony 4k TV, adjust your Sony 4k TV settings to stream H.265 files.Related program: Pavtube HD Video Converter / Mac Version: It is designed for converting HD videos from HD camcorders or DVs (like JVC, Panasonic, Sony and Cannon), non-protected HD or movies, DVR files (*.tivo) to other file types for playback on popular media devices like Apple TV, PS3, Xobx, Xobx360, WD TV HD Player.Read More:
Summary: This article keep eyes on the solution to edit the parrot bebop drone video in Avid, if you just have the issue of import and edit this video in Avid, you have come to the right place. You’ve graduated from your cheap beginner drone, and you want to try something new. Something that can shoot beautiful video from the sky—but doesn’t cost $1,000+ like a camera-equipped DJI Phantom. You spot the $500 Parrot Bebop Drone, and pull the trigger. It’s kind of fun, you think, between strings of obscenities.Perhaps you have know some detail of the Parrot Bebop Drone. It can capture video at 1080p full-HD resolution; the AR.Drone 2.0 is limited to 720p. Video is recorded to the Bebop's 8GB of internal storage (there's no microSD or SD card slot) in MP4 format. The reason why you are failed to import or cannot edit parrot bebop drone video in Avid smoothly is that the mp4 format is not a friendly editing format but a container format. For Avid, the best compatible format is DNxHD, if you want to edit the Parrot Bebop Drone video in Avid smoothly, you just need to change the original video format into DNxHD.Hot Search: QuickTime Files to Avid | H.265 to Avid | Samsung NX1 Video to AvidPavtube Video Converter for Mac(read the review) are highly recommended here, which helps to output Avid native editable DNxHD codec from Parrot Bebop Drone for further professional editing on Mac OS X. Apart from that, you can also use the "Profile Settings" function to adjust the output file video codec, size, bit rate, frame rate and audio codec, sample rate, bit rate and channels to make it more compatible with Avid editing programs.By the way, if your are a one hundred percent Windows user, please turn to Pavtube Video Converter. It has the same ability as Mac version. 
 Other Download:- Pavtube old official address: http://www.pavtube.com/video-converter-mac/- Amazon Store Download: http://www.amazon.com/Pavtube-Video-Converter-Mac-Download/dp/B00QIBK0TQ- Cnet Download: http://download.cnet.com/Pavtube-Video-Converter/3000-2194_4-76179460.htmlSteps for changing the original video format into Apple ProRes for AvidStep 1: Add Parrot Bebop Drone files to the program.Launch the software on your Mac computer, click "File" menu, select "Add Video/Audio" or "Add from folder" to import Parrot Bebop Drone video to the program.
 Step 2: Choose output format.From "Format" drop-down lists, you can select Avid Media Composer preferable editing codec from "Avid Media Composer" > "Avid DNxHD(*.mov)" as the output format.
 Step 3: Customize output DNxHD.Open "Profile Settings" window to adjust the output video codec, size, bit rate, frame rate, audio codec, sample rate, bit rate and channels.
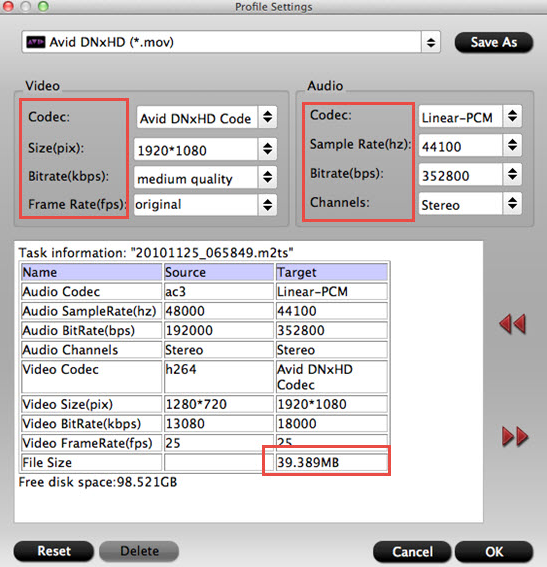 Step 4: Convert Parrot Bebop Drone Video to Avid.Hit the convert button under the preview windows, the program will start Parrot Bebop Drone video to DNxHD MOV conversion for Avid.When the conversion is completed, run Avid and import the DNxHD codec footage for post production workflow.Related program: Pavtube Media Magician / Mac Version: A nice camcorder assistant manager, lossless camcorder video joiner, MTS/ M2TS/ MXF/ MOV/ MKV/ TiVo/ WMV/ AVI/ MPG converter and editor. Meamwhile it supported upload edited video to YouTube directly.Read More:


