Monday, 14 March 2016

Play Any Video on 4K Ultra HD TV

People who has purchased a 4K TV and is still waiting for the compelling 4K content to arrive may wonder to know the possibility of playing common SD, HD or full HD content on your 4K Ultra HD TV? The answer is depends, like HD TV, 4K TV has limited support for video playback, in addition, the mismatch of file resolution of your video and 4K TV will cause bad video playback quality. Therefore, it is not an easy work to watch any video on 4K UHD TV unless you are an expert in this area. 

To help user simplify the process of watching common video on 4K UHD TV, Pavtube has upgraded support for TV profile output. Just download Pavtube Video Converter Ultimate/Pavtube iMedia Converter for Mac, you will be able to directly output any video to Samsung/Panasonic/LG/Panasonic TV profile optimized file format with all the suitable profile parameters. In addition, you can also upscale SD, HD and full HD video to 4K UHD with a resolution of 3840*2160 in the output “Profile Settings” window. 


Other Download: 

- Pavtube old official address: http://www.pavtube.cn/blu-ray-video-converter-ultimate/ 
- Cnet Download: http://download.cnet.com/Pavtube-Video-Converter-Ultimate/3000-2194_4-75938564.html 

Samsung: UN65HU8550F, UN55HU8550F, UN65HU9000F, UN55HU9000F, UN85S9VF, UN65F9000AF, UN55F900AF, UN85S9AFXZA; 

Sony: XBR-55X900A, XBR-65X850A, XBR-65X950B, XBR-49X850B, XBR-65X850B, XBR-65X900A, XBR-55X850A, XBR-79X900B, XBR-70X850B, XBR-65X900B, XBR-55X850B, XBR-55X900B, XBR-85X950B, VPL-VW600ES, VPL-VW1100ES; 

LG: 84LM9600, 65LA9650, 65LA9700, 55LA9650, 55LA9700, 84LA9800, UB8500, UB9500, UB9800; 

How to convert and play any video on Samsung/Sony/Panasonic/LG 4K Ultra TV

Step 1: Add source files to the program. 

Start up the program on your computer click “File” > “Add Video/Audio” or “Add from folder” to import source files to the program. 


Step 2: Choose TV optimized output file format. 

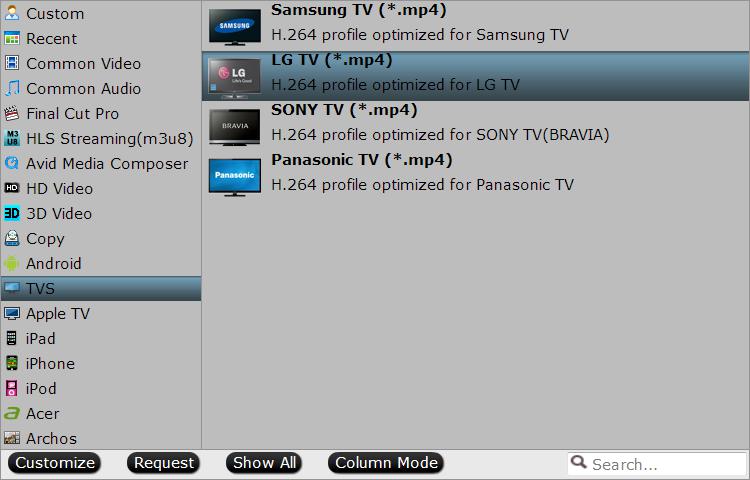
Go to “Format” bar, from its drop-down select, choose TV optimized file format to output according to your 4K TV brands, for example, if you own a LG 4K TV, you can select “TVs” > “LG TV(*mp4)” as your desired output file format. 


Step 3: Upscale to 4K resolution. 

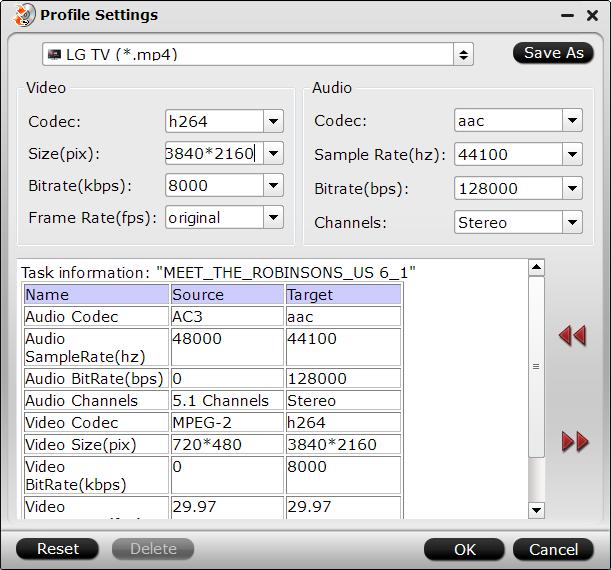
Click “Settings” icon on the main interface to open “Profile Settings” window, enter “3840*2160” in “Size(pix)” brackets, so that you will be able to upscale your SD or HD content to 4K resolution content for 4K UHD TV. 
 
Step 4: Start Video to UHD TV conversion process. 

After all the setting is completed, hit the "Convert" button under video previewing window to start the video conversion process. 

When the conversion is completed, you will be able to watch more sharper and detailed videos and movies on 4K Ultra HD TV. 

Further Reading: 

Thursday, 10 March 2016

Sony 4K XAVC S Workflow with FCP 7

Based around the XAVC S codec, a more highly compressed (Long GOP) version of pro-friendly XAVC/H.264 Level 5.2, videos are encoded in an MP4 wrapper, which means they should be relatively widely supported.

Although Sony tries their best to make the XAVC S compatible with most devices or NLEs, it is still difficult to import XAVC S videos to Final Cut Pro 7. Then what is the available workflow for editing Sony XAVC S files in Final Cut Pro 7? If you’re facing problems when using XAVC S video in FCP 7, you’ve come to the right place. The article below will outline how to get Final Cut Pro work with Sony XAVC S footage smoothly.

As we all know, Final Cut Pro 7 works best with clips in the ProRes MOV format, the easy workaround is, get a Mac ProRes Converter for FCP 7 and convert Sony XAVC S to Apple ProRes, which will save you both time and trouble, and all you need is to drag the result videos for prompt editing.

Therefore, the easy workaround is, get Pavtube Video Converter for Mac (Best XAVC/XAVC S Video Converter for Mac Review) to convert XAVC S to ProRes, which will save you both time and trouble, and all you need is to drag the result videos for prompt editing.

Overall, the program is an easy-to-use yet professional XAVC S Converter for Mac(El Capitan included). It is able to transcode XAVC S files to FCP 7 compatible ProRes 422, ProRes 422 HQ, ProRes Proxy, ProRes 422 LT, ProRes 4444 video.>> Types of Apple ProRes Codecs 

Plus, you may also encode XAVC S to Avid Media Composer, Adobe Premiere Pro, iMovie and more NLE programs highly compatible formats for smooth editing. Besides, it might help you change XAVC S to other frequent formats like MOV, MKV, MP4, AVI, etc for playback on media devices. 

The trail-before-purchase is supported, just feel free to try it:


Key Feature of Pavtube Video Converter:
  • Support nearly all HD/SD video and audio formats to various video and audio format;
  • Make videos & movies & audios compatible with Android tablets/Phones, Apple devices, Mac OS X El Capitan, video game console, websites and more;
  • Edit videos with trim, crop, split, merge and special effects;
  • Process videos and movies in batch even faster and easier;
  • Attach external *.srt, *.ass, or *.ssa subtitles into source media for entertainment;
  • Support perfect audio and video synchronization.
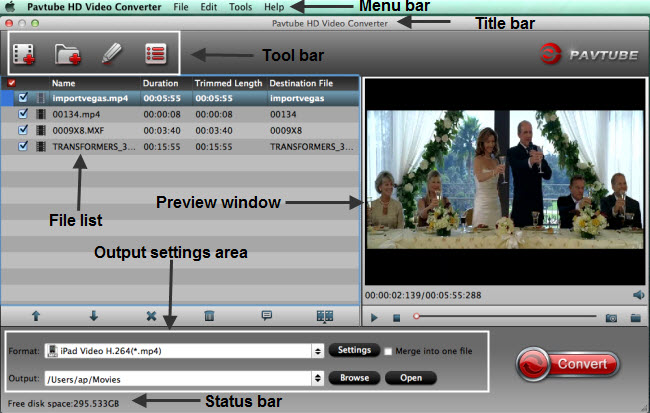
Install and run it, you will see the interface. The following is a simple instruction of how to use this Pavtube Video Converter for Mac:

Notes: 
1.When converting video to Final Cut Pro oriented format templates(e.g. Apple Prores), please ensure that your computer has Final Cut Pro 7 installed, otherwise the converted files will have audio only without image.

2.If you are using FCP X, please make sure you have installed ProApps QuickTime Codecs, or you may get files with sound only without video.

How to Get Sony 4K XAVC S Support in Final Cut Pro 7

Step 1: Add Sony 4K XAVC S footage to the program.

Launch the software on your Mac computer, click "File" menu, select "Add Video/Audio" or "Add from folder" to import Sony 4K XAVC S footage to the program.


Step 2: Choose output format.

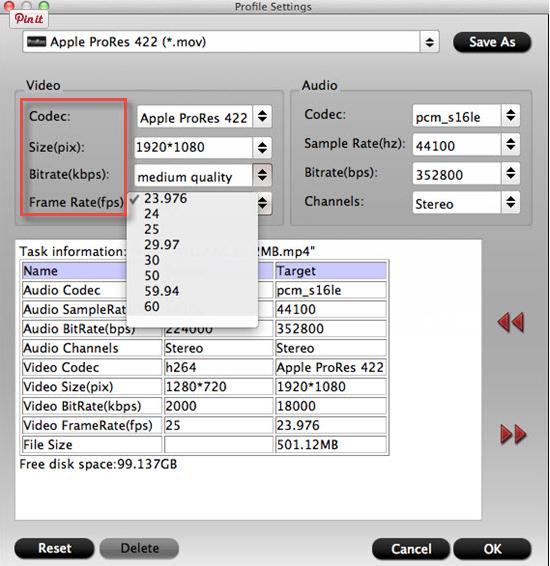
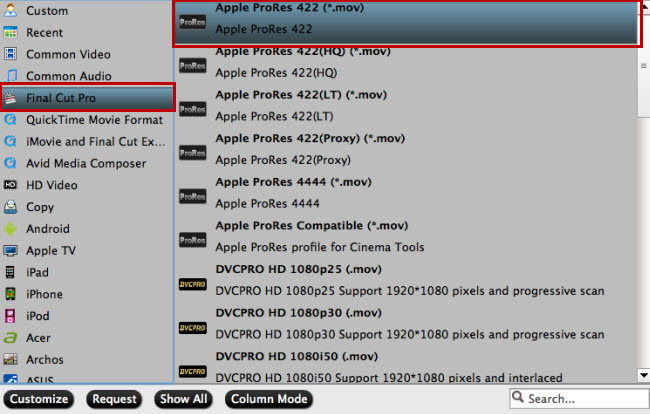
Click "Format" bar, from its drop-down options, move your mouse to "Final Cut Pro > Apple ProRes 422 (*.mov)" to select it as the output file format.

Read the difference of ProRes. 

• Apple ProRes 422 – Higher quality than Apple ProRes 422 (LT); 
• Apple ProRes 422 (HQ) – Keep original video quality for editing in FCP; 
• Apple ProRes 422 (LT) – Get a smaller file sizes than Apple ProRes 422; 
• Apple ProRes 422 (Proxy) – SD levels – 480i/p and 576i/p. Used in offline workflows. 
• Apple ProRes 4444 – Edit and finish 4:4:4 material. 

Actually, different Apple ProRes codec corresponds to different needs. Here you can refer to this article "Differences among Apple ProRes codec". 


Step 3: Customize output ProRes parameters.

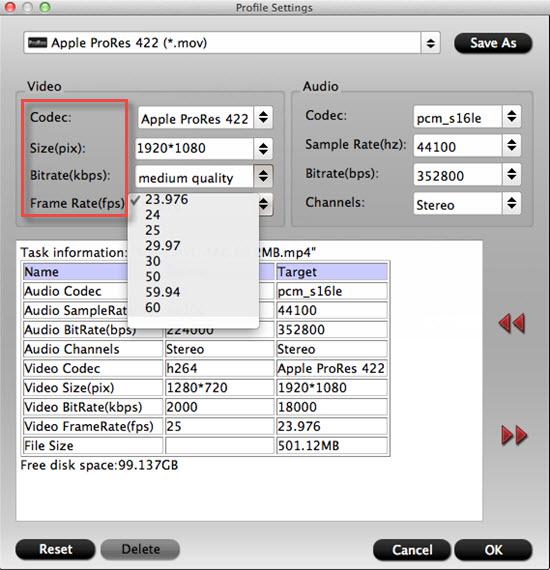
Open "Profile Settings" window to adjust the output video codec, size, bit rate, frame rate, audio codec, sample rate, bit rate and channels.


Step 4: Convert XAVC S Video to FCP 7.

Hit the convert button under the preview windows, the program will start XAVC S footage to Apple ProRes MOV conversion for Final Cut Pro 7.

When the conversion is completed, run FCP 7 and import the ProRes codec footage for post production workflow.

If you are running on Windows,for other windows NLEs please get Pavtube Video Converter.

Read More:

Monday, 7 March 2016

Working GoPro Hero4 4K MP4 Videos with DaVinci Resolve

GoPro HERO4 now has ability to capture 4K at 30 fps (4K30), allows you to move beyond HD when recording POV style footage either wearing the camera or mounting it in a number of creative ways. As the old version, GoPro HD Hero4 records video in H.264 codec, .mp4 file format. 

However, there are some problems such as not showing the video but audio only, unsupported file type when playing & editing GoPro Hero4 video in Davinci Resolve, especially in 4K. So, how to work with GoPro Hero4 4k video to Davinci Resolve beautifully?

Well, according to our multiple testing, we found two main basic reasons behind there. The Gopro Hero 4 recorded 4K MP4 videos is a compressed output format, but not ideal for editing in NLE system. What’ more, Davinci Resolve 12, 11 can handle (usually) 4K files without much problem, but it is extremely hardware intensive. The easy workaround to edit GoPro 4K MP4 videos in Davinci Resolve is to convert the 4K MP4 to a more editing-friendly format for Davinci Resolve. If you're a professional users, you must know that the most suitable format is MOV which is encoded by DNxHD codec. Therefore, a Mac 4K to DNxHD Converter can be a good assistant.

To change GoPro Hero4 4K MP4 files, you can adopt Pavtube HD Video Converter for Mac to get help. With this Gopro video converter, you can effortlessly transcode Gopro Hero4 4K MP4 to DNxHD encoded MOV, which will creat a Davinci Resolve friendly file format keeping the Gopro original quality. Besides DaVinci Resolve, this software can also export DNxHD for AvidApple ProRes for Final Cut Pro, Apple InterMediate Codec for iMovie, MPEG-2 for Adobe Premiere and more NLE systems for native editing. Windows uers can turn to the Windows version here.

Free download and have a try, it is 100% clean and safe:


GoPro Hero4 and Davinci Resolve workflow - how to convert GoPro Hero4 4K MP4 to Davinci Resolve editable format?

Download and install Pavtube HD Video Converter on your Mac (compatible Mac OS X 10.11 El Capitan, 10.10 Yosemite, 10.9 Mavericks, 10.8 Mountain Lion, 10.7 Lion, 10.6 Snow Leopard, 10.5 Leopard and lower versions). Run this program immediately.

Step 1: Load GoPro Hero4 4K .mp4 videos

Launch the Pavtube HD Video Converter for Mac, and you may either click “Add video” button to import 4k .mp4 files, or directly drag and drop the files into this program. If you’d like to combine multiple GoPro Hero4 4K files to be a single file, you can tick the check box “Merge into one file”.


Step 2: Select Resolve readable format

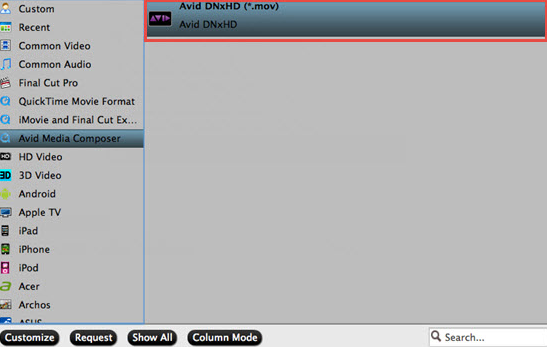
Click the “Format” to select output format. Choose “Avid Media Compose > Avid DNxHD(*.mov)” as the output format.


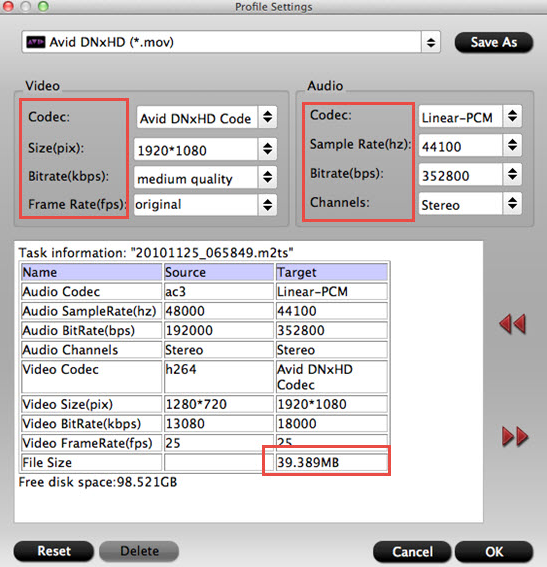
Tip: Before conversion, you can click the “Settings” icon to customize the video/audio settings including the Bitrate of Video and Audio, Video Size, Sample Rate, Frame Rate, Audio Channels, etc.


Step 3: Converting GoPro Hero4 4K MP4 video files to Davinci Resolve

After all the necessary setting have been done, click the “Start conversion” button at the bottom right corner to start transcoding GoPro Hero4 4K MP4 to DNxHD .mov. Finally, launch Davinci Resolve. Find the file in the Library panel, and then double click your clip or Right-click and select “Add into Media Pool.” Now the clip is added to your Media Pool. You can also import entire directors or a range of clips into the Media Pool. 

Hope you easy edit GoPro Hero4 4K .mp4 videos in Davinci Resolve!

Read More:

Thursday, 3 March 2016

Import and Edit Parrot Bebop Drone with Avid?

You’ve graduated from your cheap beginner drone, and you want to try something new. Something that can shoot beautiful video from the sky—but doesn’t cost $1,000+ like a camera-equipped DJI Phantom. You spend the $500 Parrot Bebop Drone, and pull the trigger. It’s kind of fun, you think, between strings of obscenities.

Perhaps you have know some detail of the Parrot Bebop Drone. It can capture video at 1080p full-HD resolution; the AR.Drone 2.0 is limited to 720p. Video is recorded to the Bebop's 8GB of internal storage (there's no microSD or SD card slot) in MP4 format. The reason why you are failed to import or cannot edit parrot bebop drone video in Avid smoothly is that the mp4 format is not a friendly editing format but a container format. For Avid, the best compatible format is DNxHD, if you want to edit the Parrot Bebop Drone video in Avid smoothly, you just need to change the original video format into DNxHD.

Hot Search4K Video to Avid | FCP ProRes to Avid MC DNxHD | Avid DNxHD MXF to FCP X

Pavtube Video Converter for Mac(read the review) are highly recommended here, which helps to output Avid native editable DNxHD codec from Parrot Bebop Drone for further professional editing on Mac.By the way, if your are a one hundred percent Windows user, please turn to Pavtube Video Converter. It has the same ability as Mac version. 


Other Download:
- Pavtube old official address: http://www.pavtube.com/video-converter-mac/
- Amazon Store Download: http://www.amazon.com/Pavtube-Video-Converter-Mac-Download/dp/B00QIBK0TQ
- Cnet Download: http://download.cnet.com/Pavtube-Video-Converter/3000-2194_4-76179460.html
Step by step to convert Parrot Bebop Drone to Avid Media Composer DNxHD on Mac

Step 1: Add Parrot Bebop Drone files to the program.

Click "Add Video" button or "Add from folder" button to import the Parrot Bebop Drone files to the application.


Tips: Before inputting files to the program, you will first need to transfer the Parrot Bebop Drone files to your local hard drive. You can connect the camera with the memory card inside to your computer via a USB cable, then turn your memory card on to locate and transfer the files to your computer hard drive.

Step 2: Select Avid DNxHD as output file format.

From the "Format" bar drop-down list, select "Avid Media Composer">"Avid DNxHD(*mov)" as the desired format for editing in Avid Media Composer.


Step 3: Customize output profile parameters.

Hit "Settings" on the main interface to open "Profile Settings" window, here you can adjust otuput video codec, size, frame rate, bit rate and audio codec, sample rate, bit rate and channels according to your own preference and needs.


Step 4: Transcode Parrot Bebop Drone files to Avid DNxHD.

When all the setting is completed, hit the right-bottom convert button to start Parrot Bebop Drone files to Avid Media Composer DNxHD conversion.

When the conversion completes, find the output folder with converted files by clicking the "Open" icon on the main interface, then feel free to do the post work-flows with Avid Media Composer.

Read More:

Monday, 29 February 2016

Easy Solution of Edit 4K in Premiere CC now with H.265 natively - Video Converter for Windows/Mac

With Premiere CC now supports H.265 natively, you may got update and tried in time, you found it really do supported edit H.265 4K, but it is not work well. Here we tell you why and give you the solution how to edit any 4K videos in Premiere smoothly without not much quality loss.

I have just tried out H.265 support in Premiere, so a brief word on this now…

First a note about hardware. I am running Mac OS X on a PC with Nvidia GTX 970.

H.265 is demanding on the GPU and I have not tried it on my Macbook Pro yet. I have no idea if the mediocre ATI cards in the Mac Pro have built in hardware support for H.265 like the latest Nvidia 9xx cards.

So on performance I can only speak for the GTX 970 for now. This is a £250 card, so certainly not the most expensive. So if you are not trend to buy a one, is there another way to edit the 4K in Premiere CC?

If you wanna edit 4K videos in Premiere CC or previous version without any problem, you'd better downscale 4K footage to 1080p and transcode the 4K stuff (formatted/encoded in R3D, XAVC, XAVC S, MP4, MOV, MXF etc.) to a more-editing friendly format, such a Premiere's MPEG-2. In the following article, we will show you how to downscale and convert 4K to 2K MPEG-2 videos so that you can edit 4K footage in Adobe Premiere CC without bogging down your computer. The process is surprisingly easy and can be done using Pavtube HD Video Converter for Mac.

It is an easy-to-use yet professional 4K Video Converter truly and fully supports input and output videos at up to 4K resolution. With it, you can effortlessly transcode 4K videos to MPEG-2 with 1080p settings on Mac El Capitan - - ensuring maximum editing quality and efficiency when working with Premiere Pro CC. Besides Premiere Pro CC, the program also supports more professional encoders, ProRes, DNxHD, AIC, DVCPRO, HDV - ensuring the best results when editing with Final Cut Pro, iMovie, Avid Media Composer, etc. respectively. Plus, this 4K Video Converter is also available to customize the output resolutions to any size like 1080p, 2K, 4K as users want.

Hot SearchBlu-ray/DVD to Premiere | MTS to Premiere | MXF to Premiere | MP4 to Premiere | 4K to Mac

Free download 4K to Premiere Pro CC Converter free trial:


Other Download:
- Pavtube old official address: http://www.pavtube.com/hd-video-converter-mac/
- Amazon Store Download: http://www.amazon.com/Pavtube-Video-Converter-Mac-Download/dp/B00QI9GNZS
- AppStore Download: https://itunes.apple.com/de/app/pavtube-hd-video-converter/id502792488?mt=12
- Cnet Download: http://download.cnet.com/Pavtube-HD-Video-Converter/3000-2194_4-76177786.html

Downscale the 4K Video to MPEG-2 for Editing in Premiere Pro CC

Step 1. Load Source 4K Video

Launch the best 4K Video Converter Mac; click "Add Video" and load your 4K UHD files to the program.


Step 2. Select "Premiere Pro CC" preset as the output format

Go to the Editing Software category and click "Premiere Pro CC" to set it as the output format.


Tips: Adjust video, audio settings

Click the "Settings" button and customize proper video/audio parameters including Video size, bitrate and fame rate and mroe. Usually 1920*1080 video size and 30fps video frame rate are recommended for Premiere Pro CC editing.


Step 3. Start 4K video to Premiere Pro CC conversion

Hit "Convert" button to let the 4K to MPEG-2 conversion on Mac begin. When the conversion finished, check the generated .mpg video for video importing, you will certainly be satisfied with its final video quality. It would be easier for you to edit with Premiere Pro CC.

Read More:

Monday, 22 February 2016

Red One 4K videos to FCP X

I have video from a RED ONE that was shot in 4.5k. I want to edit it in Final Cut      X. How do I properly convert this footage to edit in FCP X so I can revert it back to 4k for coloring in post and not lose resolution in the process. Can anyone give me advice on what will effectively edit 4K (like processor wise and memory wise and graphics card wise., etc?) Maybe the current iMac will do it. I’m not sure. Maybe a low level version of the new Mac Pro will do it, I’m not sure. I’m an artist, not a technician.
Before solved the problem, I would give some information about Red One, and why you guys cannot handle the original 4k video in FCP X.
Two generation Red One
The first Red Ones were outfitted with the 12 megapixel Mysterium sensor, capable of capturing up to 120 frames per second at 2K resolution and 30 frames per second at 4K resolution
The second generation, Red One Mysterium-X has a 14 megapixel Mysterium-X sensor. It captures up to 120 frames per second at 2K resolution and up to 30 frames per second at 4K resolution. With the upgraded sensor, the Red One Mysterium-X offers more dynamic range, higher sensitivity and enhanced color management tools than the Red One Mysterium.
Why you guys cannot handle the original 4k video in FCP X
There are many, many flavors of 4K files, and more to come. RED camera for example can be setup to shoot uncompressed RAW 4K, 3X compression, 5X compression, 8X compression, and 10X compression.
With an iMac, or even with the new Mac Pro, to handle 4K workflows effectively, you would have to add-on a Thunderbolt expansion chassis with a RED Rocket card or RED Rocket X card, at least one or two powerful graphics cards such a the GTX 680 Mac Edition, and a beefy Thunderbolt RAID like a Promise Pegasus 6-drive model. All the costs over $18800 totally.
That is to say, there is unfortunately no way you will be able to edit native 4K files at any of the higher quality, lower compression rates. The only alternative on a Mac would be to transcode to a lighter codec, such as Pro Res. Well…yes, if you convert to ProRes and scale to 2K for editing.
Solution Here
The best solution to edit 4K video on Mac with FCP X is to convert Red One 4K RAW files to Apple ProRes codec.Pavtube HD Video Converter for Mac may help you a lot on this convert part, this is the top 4K video converter on the market, it can convert any 4K videos recorded by Red One camcorder or other Red 4K camcorders, Sony 4K camcorders, Panasonic 4K camcorders, Canon 4K camcorders, JVC 4K camcorders, etc. Why need to convert 4K video on Mac to Apple ProRes codec? Because Apple ProRes codec is the native supported video codec of FCP X, once you convert 4K video on Mac to Apple ProRes 422 or Apple ProRes 4444 codec for FCP X, you will be able to edit Red One 4K videos with Final Cut Pro X smoothly. Now please download the the 4K video converter and follow the steps below to convert Red One 4K RAW files to FCP X Apple ProRes.
  
How to Downscale the 4K Red One RAW Video to Apple ProRes 422 for Editing in FCP X 
Step 1: Add Red One camcorder recorded 4K RAW files.
Launch the program on your computer, add Red One camcorder recorded 4K RAW files to the program by clicking the “Add Video” or “Add folder” button.
Step 2: Choose output file format.
From “Format” drop-down option, choose the output format according to your own preference, for FCP editing, choose “Final Cut Pro” >”Apple Prores 422(*.mov)” to output.
Tips:
1.When converting video to Final Cut Pro oriented format templates(e.g. Apple Prores), please ensure that your computer has Final Cut Pro installed, otherwise the converted files will have audio only without image.
2.If you are using FCP X, please make sure you have installed ProApps QuickTime Codecs, or you may get files with sound only without video.
Step 3: Customize output video and audio settings.
Open “Profile Settings” window to adjust output video and audio parameter settings according to your own preference. For smooth workflow of Red One camcorder recorded 4K RAW files with NLE programs, you are recommended to downscale 4K video to 1080p from “Size(pix)” drop-down selection.
Step 4: Start the conversion process.
After all the setting is over, go back to the main interface and hit right-bottom “Convert” button to start Red One camcorder recorded 4K RAW files to FCP conversion process.
When the conversion is completed, following the guides below to import Red One camcorder recorded 4K RAW files to FCP individually.
Read More:

Thursday, 18 February 2016

DJI Phantom 3 4K MP4/MOV to Sony Movie Studio 13

If you recorded some videos by DJI Phantom 3, you may like editing the 4K videos . Of course, Premiere Pro is your best choice. With this professional editing software, you can do anything as you want. 

The Phantom 3 Professional, which can do 4K video, and the Phantom 3 Advanced, which only offers 1080p video, but is otherwise the same.

Video Resolution:
  • Phantom 3 Professional: Up to 4K @ 30fps (4096x2160p 24/25, 3840x2160p 24/25/30)
  • Phantom 3 Advanced: Up to 1080p @ 60fps (1920x1080p 24/25/30/48/50/60)
  • Photo Resolution: 12 Megapixel
  • Video Format: MP4 or MOV
  • Photo Format: Adobe DNG RAW and JPEG
But, we can't import the DJI Phantom 3 4K videos to Sony Movie Studio 13 directly due to the codec incompatibility. The Phantom 3 recored MOV files are compressed using the h.264 codec, which is final delivery codec and it is not one you want to use for editing. Therefore you first need to transcode DJI Phantom 3 media to a more editing-friendly format, such a Sony Movie Studio's MPEG-2.

Hot SearchDJI Inspire 1 4K to 1080P | H.265 4K to Ultra HD TV | Compress 4K Video to 1080p

Here you can download and applyPavtube Video Converter for Mac(read the review) to achieve the goal in a fast way. This video converter perfectly works as the 4K to Sony Movie Studio 13 Converter that helps you convert any 4K files to MPEG-2, which is the best format for Premiere to edit with ease. No expensive add-ons or plug-ins are required. With it, you may also transcode 4K video to Avid Media Composer, Sony Vegas Pro, Windows Movie Maker, Pinnacle Studio and more NLE programs highly compatible formats for editing.


Convert DJI Phantom 3 4K videos into Sony Movie Studio 13

Step 1: Add Phantom 3 MOV files

Install and launch the DJI Phantom 3 to Sony Movie Studio Converter, and then click "Add" button to import your Phantom 3 4k files to the software.


Step 2: Choose output format

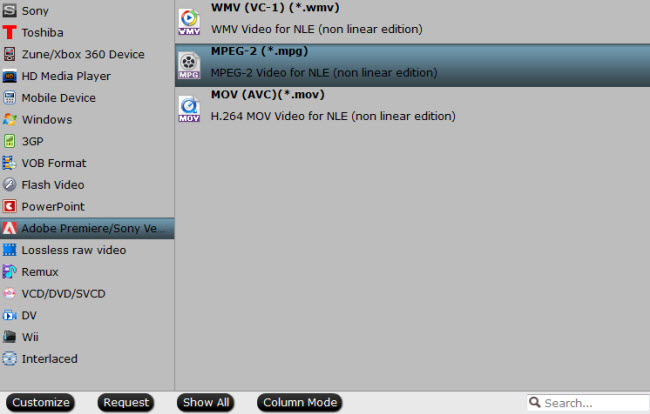
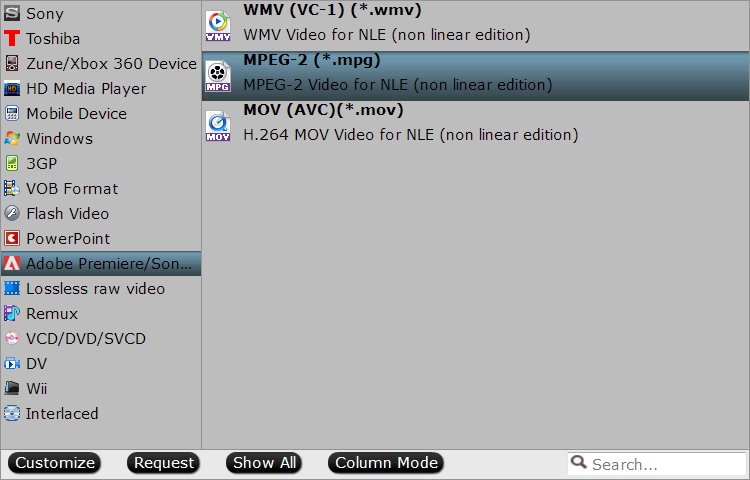
Click “Format” bar and choose "Adobe Premiere/Sony Vegas > MPEG-2 (*.mpg)” as output format on the drop-down menu. Of course, you can also choose AVI, WMV from “Common Video” as the output format.


Tip: Click the Settings icon to adjust video and audio parameters on the Profile Setting as you need to get the best quality video.

Step 3: Convert Phantom 3 4K to Sony Movie Studio

Simply click the "Convert" button to start converting and everything else will be automated. You're done. Now your DJI Phantom 3 mov files will be converted into MPG files ready to be imported to Sony Movie Studio 13 as well as Movie Studio 10/11/12 beautifully.

Related program:

Pavtube Media Magician / Mac Version: A nice camcorder assistant manager, lossless camcorder video joiner, MTS/ M2TS/ MXF/ MOV/ MKV/ TiVo/ WMV/ AVI/ MPG converter and editor. Meamwhile it supported upload edited video to YouTube directly.

Read More: