I'm trying to edit some Nikon P610 clips in Windows Movie Maker, but it doesn't support Nikon P610 h.264 .mov files, how do I convert the files into and acceptable file? Does Windows Movie Maker hold MOV formatted files? Windows Movie Maker has various multimedia functions; it can be used to make movies, documentaries, audio-video clips etc. Nikon P610 h.264 .mov files files are not recognized in Windows Movie Maker. To use an Nikon P610 h.264 .mov files, you has to transfer the Nikon P610 h.264 .mov files to AVI format. For this one can use the help of encoders like Super. Here we highly recommend you Pavtube Video Converter to convert Nikon P610 h.264 .mov files to Movie Maker. With it, you can complete conversion from MOV to WMV within seconds. So that you can freely play or edit your Nikon P610 h.264 .mov files on Windows Movie Maker.With it, you can take care of the settings of video scale, aspect, frame and Bitrate kbps for a specific resolution of a video before converting. Get a free trial now.
 Other Download:- Pavtube old official address: http://www.pavtube.com/video_converter/- Amazon Download: http://download.cnet.com/Pavtube-Video-Converter/3000-2194_4-75734821.html- Cnet Download: http://download.cnet.com/Pavtube-Video-Converter/3000-2194_4-75734821.htmlGuide on Convert Nikon P610 h.264 to HD WMV for Editing in Movie MakerStep 1. Load the Nikon P610 h.264 .mov files.Click "Add Video" button to load your Nikon P610 h.264 .mov files as soon as you get into the main interface. Or you can drag & drop the files to the software directly.
 Step 2. Choose the output formatClick the "Profile" drop down list to select a proper video foramt as you want. Here you just need to hit the "Profile" box and select "HD Video" > "WMV HD" on the dropdown menu as output format.
  Step 3. Set Video Resolution at 1080p.Click "Settings" button; you can adjust video and audio settings, including codec, aspect ratio, bit rate, frame rate, sample rate, and audio channel. To down-convert ultra HD 4K to 1080p, do remember adjusting video size to 1920*1080. That is the exact 1080p.
 Step 3. Start transcoding Nikon P610 h.264 .mov files to HD WMV.When everything is OK, hit "Convert" button at the bottom of the main interface to let the Nikon P610 h.264 .mov files to 1080p .wmv conversion begin.When the conversion finished, check the generated 1080p video, you will certainly be satisfied with its final video quality. It would be easier for you to playback and edit your Nikon P610 h.264 .mov files in windows movie maker.Read More:
Summary: So many people are not clear the differences between H.264 QuickTime and a ProRes QuickTime file, here we list some main features of the two QuickTime files, and then tell you why don’t we choose the H.264 QuickTime for editing and the solution to how to smoothly edit the h.264 QuickTime files in FCP with ProRes codec.The Difference Between H.264 QuickTime and a ProRes QuickTime FileThink of the QuickTime .mov file as a container. This container can contain various audio and video codecs. H.264 and ProRes 422 are both video codecs that can be used in a QuickTime Container. H.264 is a "group of pictures" compression scheme, which achieves compression by starting with one full frame, and then for the next 24 or so frames, it uses partial frames that attempt to capture what has changed since the full frame. These partial frames will have information like direction of motion, and what has changed from the previous frame.To give an example, let's say you have a video clip of a duck flying across the sky. The i-frame is a complete "photo" of the scene. It is compressed, much like a JPEG photo is compressed, but it stands alone. The next few frames will have heavily compressed information like "the background is moving left to right at this rate", "the duck is flying right to left", "the duck's wings are going up and down", and everything else stays the same. Then in 24 frames, you do it again.ProRes 422 is still somewhat compressed, but each frame stands on its own. It is not dependent on the other frames around it.This is much better for editing, because if you edit out the full i-frame in a group of pictures, you make the next 24 frames worthless. You can overcome this by converting to full frames as you are editing, but this takes a much more powerful processor and more memory. So the standard practice is to convert everything to full frames on import.This means that Pro Res can be 10 times (or more) larger than h.264 (It is not 24 times larger, because the partial frames in GOP compression still take up some room.)Pro Res 422 is mainly used for editing. You can correct color, add titles and effects, etc. without losing the quality of the clips. H.264 is used mainly as a delivery codec. Once editing is finished, you might create an h.264 copy so you can play the file on an iPhone or send to YouTube.H.264 is also used in some video cameras as a way to capture HD footage in a format that will fit on an SDHC card. AVCHD, which is similar to h.264, is also used in cameras.Why don’t we choose H.264 for editing in FCP? Do not edit h.264 in FCP...it is not an editing codec. It might work for a few shots, but as you add more and more, the processors get taxed more and more and things slow down, and eventually things are unworkable.In large measure, H.264 codec isn't one of the easy setups in FCP, it isn't an editing codec.In fact, H.264 is highly compressed, it is possible to use H.264 in Final Cut Pro sometimes, but don't expect it to result in top quality. For natively editing H.264 MP4 files in Final Cut Pro, you need to convert MP4 to a more editing-friendly format, such a Final Cut Pro's ProRes.Hot Search: XAVC/AVCHD to FCP | MXF to FCP | AVCHD M2TS to FCPTo do the H.264 to Prores Conversion, as well as to keep your video quality, you need a professional HD Video Converter for Mac. If you want to find an easy-to use and professional tools, here recommend you Pavtube HD Video Converter for Mac(read the review). The one used here can meet your demands with its simple interface but rich functions. With it, you can effortlessly transcode H.264 QuickTime files to ProRes 422 encoded MOV for Final Cut Pro.Meanwhile, the HD Video Converter can create files compatible with various non-linear editing systems like Avid, FCE, iMovie, and Adobe Premiere (Pro) etc. The HD converter also works on MacBook, MacBook Pro, MacBook Air, iMac running Mac OS X Snow Leopard, Lion, Mountain Lion, Mavericks, Yosemite and El Capitan etc. Just download it and follow the guide and go on your movie director experience.
 Other Download:
Guide: Transcoding H.264 QuickTime to ProRes 422 codec for Final Cut ProStep 1: Add H.264 QuickTime footage or video clips to HD converter for FCP. You can directly drag and drop video files to this software.
Other Download:
Guide: Transcoding H.264 QuickTime to ProRes 422 codec for Final Cut ProStep 1: Add H.264 QuickTime footage or video clips to HD converter for FCP. You can directly drag and drop video files to this software. Step 2: Select to rewrap your H.264 files to "Apple Prores 422(*.mov)" or "Apple Prores 422(HQ)(*.mov)" for natively editing with FCP.
 Tips: You can click on Settings to adjust audio and video parameters including video size, video frame rate, bitrate, sample rate, audio channel.
 Step 3: Hit "Convert" button to carry out the conversion process. When the conversion ends, you can run the Final Cut Pro and click File --> Import --> Files to import the converted Apple Prores files and natively edit them in FCP easily, if you are a newer of FCP you can follow this import video to fcp guide.Read More:
Summary: The Christmas bell has rung, but you were not happy at all. Best of failed to import the Christmas party in Avid, not even to mention give all of your friends a surprise with vivid video clips after add effects. So you have come the right place, here I give the solution of editing all kinds of camcorder video in Avid smoothly. As the most important part of the Christmas Party, recording with a camera become the symbol of fashion. However, all the happy time is always short, you want to memorize the happy moving moment with your camcorder, you are not happy any more when you have problems of importing the Christmas video clips into Avid.No matter what kind of the video format of your recorded video, such as AVCHD, XAVC/XAVC S, MXF, MTS AVCHD, MOV, MP4, MVI, etc. It is good at storage into SD card but not friendly with Avid.As we all know that like other professional non-linear video editing program, Avid Media Composer also has its own native editing codec - DNxHD, which is specially designed for nonlinear editing and complex multi-generation composing in post production. To create Avid DNxHD editing codec, you can download Pavtube Video Converter for Mac(read the review), a professional Mac video decoder to beneficially encode all kinds of your Christmas Party recorded video to Avid Media Composer 8/7/6.5/6 optimized DNxHD codec.Hot Search: XAVC S to Avid | H.265 to Avid | QuickTime Files to AvidMoreover, Pavtube Video Converter for Mac also allows you to customize profile settings to get a desired and better output. Movie creation with this program is no big deal. You can edit your video files by trimming, cropping, attaching external subtitles, adding watermarks, change video effect, etcBy the way, if your are a one hundred percent Windows user, please turn to Pavtube Video Converter. It has the same ability as Mac version. Other Download:- Pavtube old official address: http://www.pavtube.com/video-converter-mac/- Amazon Store Download: http://www.amazon.com/Pavtube-Video-Converter-Mac-Download/dp/B00QIBK0TQ- Cnet Download: http://download.cnet.com/Pavtube-Video-Converter/3000-2194_4-76179460.htmlSteps for Converting Christmas Party Video to Avid DNxHDStep 1: Add camcorder Christmas video files to the program.Launch the software on your Mac computer, click "File" menu, select "Add Video/Audio" or "Add from folder" to import Christmas video to the program. Step 2: Define output file format.Click "Format" drop-down option, choose Avid Medic Composer best editing codec from "Avid Media Composer" > "Avid DNxHD(*.mov)
 Step 3: Adjust output profile settings.Open "Profile Settings" window to adjust the output file video codec, size, bit rate, sample rate, audio codec, sample rate, bit rate and channels according to your own needs.
 Step 4: Convert Christmas video to Avid DNxHD.On the main interface of the program, hit right-bottom "Convert" button to start to encode Avid DNxHD from camcorder Christmas video files.When the conversion is completed, click the "Open output folder" icon on the main interface to find the converted files, you can then import and edit those files with Avid Media Composer with no problem.Read More:
Summary: Have no idea of converting Sony AX33 4K XAVC S Video to FCP X Workflow with best supported format with ease? Follow the article and get the smooth way.Sony's prosumer 4K AX33 camcorder, the first 4K/UHD (2160p) camcorder with a 1-inch sensor, Sony's latest prosumer entry into that market makes up for it with more advanced optical image stabilization. The FDR-AX33 records 4K and HD movies in the XAVC S format, capture the finest details in 4K Ultra HD 3840 x 2160 resolution. In addition, the fast Bionz X image processor is the same one employed in professional Sony camcorder models, making it possible to record 60p movies at Full HD resolution for incredibly smooth and sharp playback, with no loss in realism, even when panning the camera and shooting moving subjects.I have just downloaded Sony's XAVC/XD CAM Plug in and I still can't import XAVC S footage into FCP X. I am using the latest edition of FCPX(10.1.3) and Apple's Mavericks operating system. Also, my Mac has been updated with the ProApps QuickTime Codecs version 1.0.5. Just like the Question above, many Final Cut Pro X users have the problem in importing XAVC S 4K videos from Sony AX33 into FCP X on Mac. Now, let me share the FCP X XAVC S solution with everyone.As we know, Final Cut Pro has supported ProRes MOV format for many years now, and Apple ProRes codec video is supported by Final Cut Pro well. So we can transcode Sony Sony AX33 XAVC S to ProRes codec on Mac via a Mac video converter. Pavtube HD Video Converter for Mac(revivew), a cross-platform and professional video conversion application which supports to convert both 4K and XAVC S video to Final Cut Pro importable formats such as Apple ProRes 422 MOV and Apple ProRes 4444 MOV on both Windows and Mac (read more about different types of Apple Prores Codecs). In addition, this program is good at converting downloaded MKV, MOV, WMV, AVI movies to popular Android/Windows/IOS devices, such as Galaxy Tab 3, Surface 2, iPad Air etc. If you have installed other editing software in you computer, you can convert the 4K XAVC S codec video for your software. Premiere, iMovie, Final Cut Express, Sony Vegas are included. Other Download:
How to Import Sony AX33 4K XAVC S to Final Cut Pro X?Step 1: Transfer Sony AX33 4K XAVC S video to Mac computer.You can fit the Micro SD card recorded with your Sony AX33 4K XAVC S video footage into a Micro SD adaptor and then plug it into the SD media slot on your Mac computer for transferring media files to your Mac local drive.Step 2: Add source video footage files to the program.Launch the application on your Mac computer, click the "Add Video" or "Add from folder" button to import Sony AX33 4K XAVC S source files to the program.Step 3: Choose output file format.Click "Format" bar and from its drop-down list, choose "Final Cut Pro" > "Apple Prores 422 (*.mov)" as the final output format for your further workflows with Final Cut Pro X.Step 4: Start to convert Sony AX33 4K XAVC S video to Apple Prores 422.On the main interface of the tool, tap the "Convert" button on right-bottom to start the conversion process from Sony AX33 4K XAVC S to FCP X Prores 422 transcoding process.When the conversion is completed, feel free to import converted video to Final Cut Pro X to polish and enhanced your camera videos with all its advanced tools.Read More:
Summary: Once you got Panasonic Lumix G7, the first thing you would think about is share the high quality images and videos with your friends or families. Here we introduce you the way to enjoy the Panasonic Lumix G7 AVCHD video on your big screen Panasonic TV.The Panasonic Lumix DMC-G7 is the latest in the company's line of DSLR-styled mirrorless cameras. I'm talking about Panasonic's 4K Video feature, which lets you extract high-resolution video from 4K, 30 fps videos and save them at an 8-megapixel equivalent. This is particularly useful when you shoot moving subjects, as you're able to record a 4K video (roughly up to 30 minutes), choose whatever frame you want from it and save that to the camera's SD card. Is it cheating? Perhaps, but it works perfectly.May be you have stored many AVCHD files from Lumix G7, all of them have a high resolution and you wanted to play them on Panasonic TV to share with your friends and families in recently days via USB, you were hoping that the Panasonic TV would play the AVCHD files but apparently that won’t work. So you want to figure out a good way to solve this problems.Hot Search: TOP 10 4K TVs | XAVC S on 4K UHD TV | H.265 4K to Ultra HD TVSearched on the internet, you find out many converter can convert your Lumix G7 AVCHD video into Panasonic supported one for watching, but you have no idea of which one you should choose. In my opinion, Pavtube HD Video Converter for Mac(read the review) is the best converter to convert Lumix AVCHD to Panasonic TV, it can keep the original AVCHD source quality after converted. Meanwhile, This HD video convert also has ability to convert XAVC, XAVC L, MXF, H.265 HEVC,MKV, AVI, MTS, WMV, MOV, MPG… any popular video files to a decent format you need. Other Download:- Pavtube old official address: http://www.pavtube.com/video-converter-mac/- Amazon Store Download: http://www.amazon.com/Pavtube-Video-Converter-Mac-Download/dp/B00QIBK0TQ- Cnet Download: http://download.cnet.com/Pavtube-Video-Converter/3000-2194_4-76179460.htmlHow to Watching Panasonic Lumix G7 AVCHD Videos to Panasonic TV?Note: The Mac Version as example, Windows Version has the same Steps except the main interface logo.Step 1. Import source video from Panasonic Lumix G7 to this app by clicking the "Add video" button on the main UI. Or choose to add multiple videos from the same folder on your computer hard drive.Step 2. You can also choose compatible video format from "TVS" extended selections, here you can select the Panasonic TV (*.mp4) 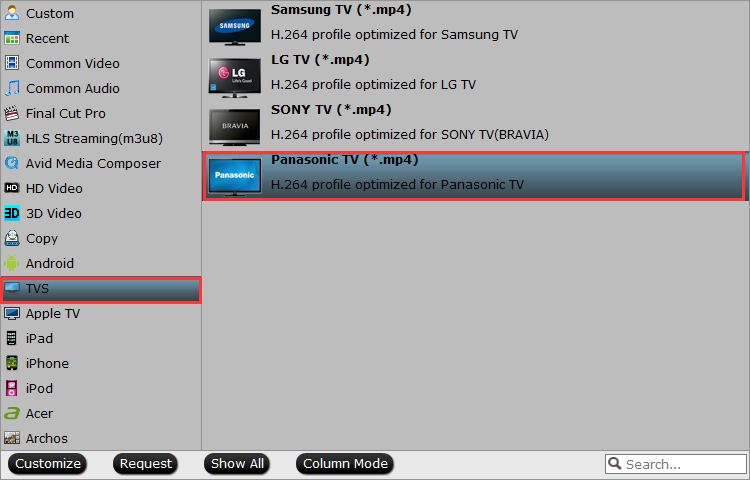 Step 3. Adjustments like video size, bitrate, frame rate, sample rate, and channels are available. The 5.1 channel allows you to enjoy sounds from different directions and turns your home to a grand concert.
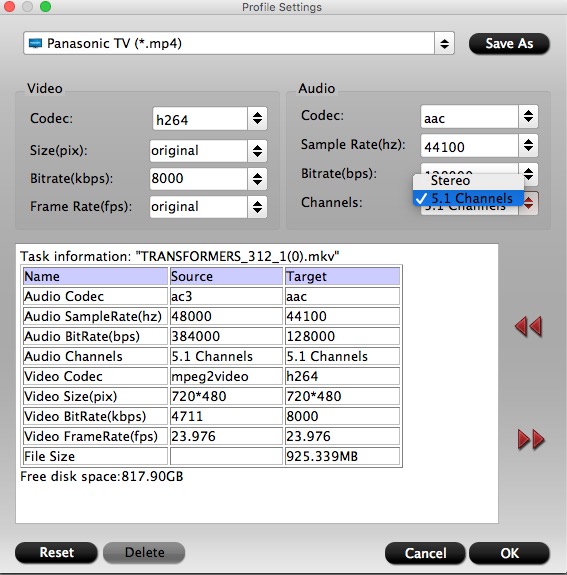 Step 4. After you have properly set up all the output profile parameters, start the conversion process by hitting right-bottom convert button.You can find the generated files by clicking "Open output folder" when the conversion is completed. Transfer them to an external USB hard drive and plug the drive into your Panasonic TV, you will have no difficulty to watch Panasonic Lumix G7 Recorded Videos on your large screen Panasonic TV.Related program: Pavtube MXF Converter / Mac Version: can handle MXF/MXF footage produced by Canon, Sony and Panasonic camcorders and convert MXF video files to various video format supported by popular devices such as iPad Air/4/3, iPhone 5S/5C/5/4S/4, Apple TV 3, Google Nexus, Samsung Galaxy Tab S/3/2, Samsung Galaxy S5/S4/S3, Surface RT/Pro, PS4/PS3, WDTV, etc.Pavtube MTS/M2TS Converter / Mac Version:The best MTS converter on the market, which can convert MTS videos and other HD formats to FCP X Apple ProRes codec MOV format, or convert MTS to Avid Media Composer/Adobe Premiere Pro/iMovie native supported video format.Pavtube Media Magician / Mac Version: A nice camcorder assistant manager, lossless camcorder video joiner, MTS/ M2TS/ MXF/ MOV/ MKV/ TiVo/ WMV/ AVI/ MPG converter and editor. Meamwhile it supported upload edited video to YouTube directly.Read More:
Pavtube Facebook Rolls out 2015 Thanksgiving & Black Friday & Cyber Monday Crazy Promotion with 50% OFF for All Blu-ray/DVD/Video Softwares Are you ready for a crazy online shopping after Thanksgiving Coupons in the next few days on Black Friday and Cyber Monday? These meaningful major festivals is best the best chance for people to find out the best deals to reserve for upcoming Chrismas.The discount offering is to show gratitude to valued customers and potential users of Pavtube software, so we Roll out 2015 Black Friday & Cyber Monday Sales with 50% Discount for top-selling Windows/Mac Blu-ray/DVD rippers and Video converters, which can help you move favorite Blu-ray/DVD movies or convert digital videos to any home devices for home use! Pavtube video products can also assist you to creat special timeless memories for this year's festivals.What can Pavtube do?1) Convert common, HD, 3D, 2K/4K Videos and Blu-ray/DVD into H.265/HEVC, M3U8, MP4, Apple ProRes, DNxHD, MOV, M4V, MOV, MKV, AVI, Xvid, Divx, VOB, MPEG-2, SWF, FLV... for playback on smartphone, tablet, TV set, HD media player, streaming server, Hard drive, Game console, or edit in Final Cut Pro, iMovie, Adobe Premiere Pro, Avid Media Composer, etc. 2) Convert Canon/Sony/Panasonic/Nikon/JVC/Blackmagic shooted H.265, XAVC, XAVC S/L, MXF, MOV, AVCHD, AVI, MP4, VOB footages into common video formats, so you can watch or edit them on PC/Mac. 3) Convert MXF, P2 MXF, XAVC MXF, XACAM MXF with Multiple audio track/channel preserver or mixer.4) 1:1 Backup Blu-ray/DVD without region code or protection limit in two clicks. 5) Convert Blu-ray/DVD movies to MKV/MP4/MOV with multiple audio tracks and subtitlesExpire on Dec 6.Part 1. 50% Discount for Top-selling Windows/Mac Video ConvertersTop 1. 50% OFF Video Converter UltimateOriginal Price: $65Now: Only $32.5Free Trial Limit PurchaseHow-ToTop 2. 50% OFF iMedia Converter for Mac Original Price: $65Now: Only $32.5Free Trial Limit PurchaseHow-ToTop 3. 50% OFF Video Converter for WindowsOriginal Price: $35Now: Only $17.5Free Trial Limit PurchaseHow-ToTop 4. 50% OFF Video Converter for MacOriginal Price: $35Now: Only $17.5Free Trial Limit PurchaseHow-ToTop 5. 50% OFF HD Video Converter for WindowsOriginal Price: $35Now: Only $17.5Free Trial Limit PurchaseHow-ToTop 6. 50% OFF HD Video Converter for MacOriginal Price: $35Now: Only $17.5Free Trial Limit PurchaseHow-ToTop 7. 50% OFF MTS/M2TS Converter for WindowsOriginal Price: $29Now: Only $14.5Free Trial Limit PurchaseHow-ToTop 8. 50% OFF MTS/M2TS Converter for MacOriginal Price: $29Now: Only $14.5Free Trial Limit PurchaseHow-ToTop 9. 50% OFF MXF MultiMixerOriginal Price: $45Now: Only $22.5Free Trial Limit Purchasehttp://www.multipelife.com/mxf-multimixer/tipsTop 10. 50% OFF iMixMXF: $22.5Original Price: $45Now: Only $22.5Free Trial Limit PurchaseHow-ToTop 11. 50% OFF MXF Converter for WindowsOriginal Price: $29Now: Only $14.5Free Trial Limit PurchaseHow-ToTop 12. 50% OFF MXF Converter for MacOriginal Price: $29Now: Only $14.5Free Trial Limit PurchaseHow-ToPart 2. 50% Discount for Top-selling Windows/Mac Blu-ray/DVD ripping & copying SoftwaresTop 1. 50% OFF BDMagic for WindowsOriginal Price: $49Now: Only $24.5Free Trial Limit PurchaseHow-ToTop 2. 50% OFF BDMagic for MacOriginal Price: $49Now: Only $24.5Free Trial Limit PurchaseHow-ToTop 3. 50% OFF ByteCopy for Windows Original Price: $42Now: Only $21Free Trial Limit PurchaseHow-ToTop 4. 50% OFF ByteCopy for MacOriginal Price: $42Now: Only $21Free Trial Limit PurchaseHow-ToTop 5. 50% OFF DVDAid for WindowsOriginal Price: $35Now: Only $17.5Free Trial Limit PurchaseHow-To Top 6. DVDAid for MacOriginal Price: $35Now: Only $17.5Free Trial Limit PurchaseHow-To Learn more at Pavtube Facebook: https://www.facebook.com/pavtubefans/?sk=app_186981981345123If you have any problem to buy or use Pavtube, pls feel free to contact support@pavtube.com (for Windows user),macsupport@pavtube.com (for Mac user).Read moreClick here get more Pavtube programsClick here to get 20% off for Pavtube Facebook FansClick here to get Blu-ray/DVD/Video/DRM software bundle PromotionsClick here to get HD/MXF/MTS/DVD Creator software bundle PromotionsClick here to get Weekend Special offers